Cockpit is an application from cockpit-project.org for the configuration of Linux servers. Cockpit offers a user-friendly graphical interface that enables authenticated users to execute any configurations and commands on a device via a secure connection. Network configuration, user administration, status and log views can be managed via a browser. Cockpit, also known as Web Console, is an open source software project sponsored by Red Hat and published under the GNU Lesser General Public License (LGPL).
Cockpit for Revolution Pi is available from the RevPi Bookworm Image upwards and replaces the application RevPi Status, also known as Webstatus, which was used until the RevPi Bullseye Image.
In addition to the standard server configuration, the plugins Revolution Pi and Node-RED are available. They enable the basic configuration of your RevPi base module and a simple activation or deactivation of the services installed.
Starting Cockpit #
✓ RevPi Bookworm Image oder höher ist auf dem RevPi installiert.
▷ Establish a network connection between the RevPi and your PC.
▷ Open a web browser.
▷ Call up Cockpit via the web browser with revpi[serial number].local
You can find the serial number of the RevPi on the front of the housing next to the QR code.
Alternatively, you can enter the IP address of the RevPi in the web browser.
❯ The warning NET::ERR_CERT_AUTHORITY_INVALID may appear in the browser.
▷ Accept the security exception to continue with the login.
❯ The login screen for Cockpit appears.
▷ Log in with user name pi and the device password.
You will find the device password on the sticker on the side of the RevPi housing.
|
Note
|
From the RevPi Bookworm Image (08/2025), after 3 failed login attempts, access is locked for 10 minutes. |
❯ Cockpit opens in Limited access mode.
▷ Select Limited access in the top main navigation bar to switch to Administrative access mode.
❯❯ With the elevated rights of this administrative access you can now configure the RevPi.
Configuration #
▷ Open the Cockpit menu Revolution Pi.
❯❯ The configuration areas RevPi Apps, Runtimes, System Configuration and WLAN and BT are displayed.
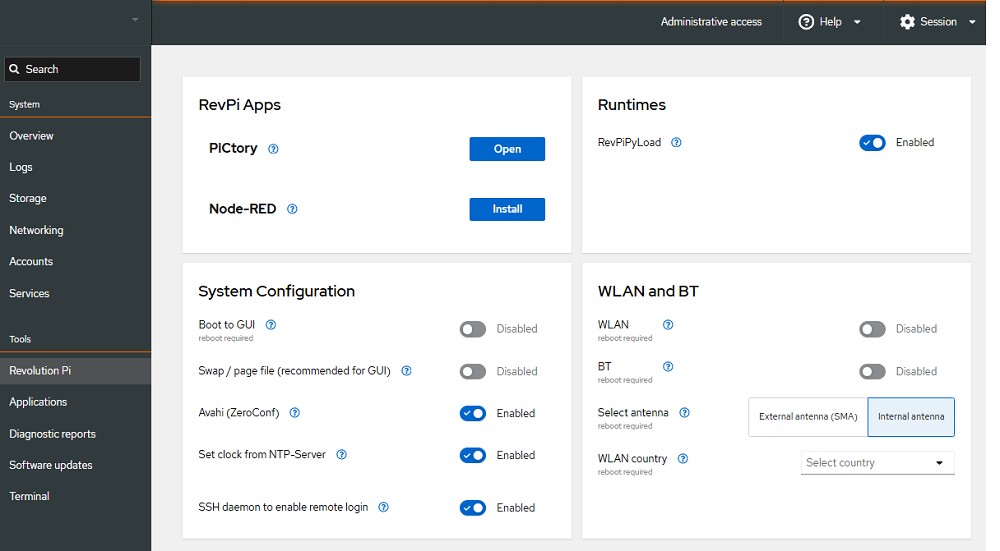
RevPi Apps #
RevPi Apps are available applications on your RevPi.
Runtimes #
RevPiPyLoad is a Python-based runtime environment for RevPi. The runtime manages real-time industrial automation tasks and runs user-defined Python scripts.
▷ Activate RevPiPyLoad if you want to run user-defined Python scripts on your RevPi.
|
Note
|
Ensure your scripts are compatible with RevPiPyLoad before enabling. |
See also:
System Configuration #
Boot to GUI #
In desktop mode, you can boot the RevPi directly into a graphical user interface as an alternative to the terminal.
-
The GUI uses more RAM and processing power than a terminal.
-
Recommended for users unfamiliar with command-line operations.
See: Boot to GUI
Swap / page file #
Swap memory acts as virtual RAM. RAM data is stored on the eMMC permanent memory.
▷ Enable swap to prevent system crashes when RAM is exhausted.
▷ Disable swap when performance is low.
Avahi (ZeroConf) #
Avahi enables ZeroConf networking, allowing easy discovery of network services.
-
Accessing the device using
hostname.localinstead of an IP address. -
Automatically discovering printers and file shares.
|
Note
|
You cannot disable Avahi while connected to Cockpit via an Avahi address (.local). If you need to disable it, use the command line or connect Cockpit via the device’s IP address instead. |
Set clock from NTP-Server #
Synchronizes the RevPi system time with an NTP server for accuracy.
-
Ensures accurate timestamps for logs and scheduled tasks.
-
Prevents time drift on devices without a real-time clock.
An active internet connection is required to synchronize with NTP servers.
SSH daemon #
The SSH daemon manages the SSH connections to your RevPi.
▷ Enable SSH to allows remote terminal access to the RevPi over a network.
▷ Use strong passwords or SSH key-based authentication.
▷ Use ssh pi@revpi[serialnumber].local to connect via SSH.
▷ Disable SSH if remote access is not required.
WLAN and BT #
Configuration of the built-in wireless connection module. This applies to:
WLAN #
▷ Enable toggle to activate WLAN.
▷ Select the WLAN country code. Choose the country where you are using the device.
-
Setting the correct country helps prevent connection issues and improves network reliability.
-
Different countries allow different WiFi channels and signal strengths.
▷ Select antenna for wireless connectivity.
-
External antenna (SMA): provides better signal reception in challenging environments. Connect a RP-SMA WLAN antenna at the RP-SMA socket of the RevPi.
-
Internal antenna: uses the built-in antenna.
❯❯ WLAN is activated.
Continue with setting up WLAN connection via nmtui.
▷ Disable WLAN to reduce power consumption and increase security.
BT #
▷ Enable BT for using Bluetooth peripherals such as keyboards or audio devices for your RevPi.
▷ Disable BT to reduce power consumption and increase security.
Firewall #
From the RevPi Bookworm Image (08/2025), the Revolution Pi System is additionally protected by a firewall (firewalld). The firewall blocks unauthorized access while allowing data traffic through the necessary ports. The port configurations are defined in the respective packages.
▷ Open the Cockpit menu Networking.
▷ In the section Firewall, select Edit rules and zones.
▷ Add firewall rules for additional services/ports:
-
revpi-codesys for the CODESYS Development System
-
revpi-modbus-default for Modbus Server
-
opcua-server-default for OPC UA Server
▷ Select Custom Ports for additional ports not covered by the standard ports listed above.
Alternatively, the firewall can be modified via a terminal:
| Command | Function |
|---|---|
|
Opens the firewall configuration. |
|
Adds standard ports for the connection to the CODESYS Development System. |
|
Adds standard ports for Modbus Server. |
|
Adds standard ports for OPC UA Server. |
|
Adds additional ports that are not covered by the standard ports listed above. |
|
Reloads the firewall (necessary after changing the firewall configuration). |
Accounts and Device Password Management #
Use the Cockpit user management to change the RevPi device password or to create new accounts.
|
Important
|
▷ Change the default device password after the first login to the device to prevent unauthorized access. ▷ Use a strong password. |
|
Important
|
Do not delete user accounts pi or root, otherwise it will no longer be possible to log in. |
▷ Open the Cockpit menu Accounts.
▷ Open the three-dot menu ⁝ for user pi and select Edit user.
▷ Select Set password.
▷ Enter the new password twice and confirm with Set password.
❯❯ The device password for user pi has been changed.
Changing Language for Cockpit #
The following languages are supported for the Cockpit RevPi Applications:
-
English
-
German
▷ Open the drop-down menu Sessions in the top main navigation bar.
▷ Select Display language to change the language for Cockpit.
Rebooting RevPi #
▷ Open Cockpit menu Overview.
▷ Select Reboot at the top right.
▷ Select a Delay for the reboot.
▷ Select Reboot.
❯ The RevPi is shut down and will reboot. The power LED flashes red.
❯ The power LED lights up green as soon as the RevPi is ready for operation.
▷ Select Reconnect and log in.
Shutting Down RevPi #
▷ Open the Cockpit menu Overview.
▷ Open the dropdown next to Reboot and select Shutdown.
▷ Select a Delay for the shutdown.
▷ Select Shutdown.
❯ The RevPi is shut down and disconnected from Cockpit.
To restart the RevPi, the power supply must be disconnected and reconnected.
Terminal #
▷ Open the Cockpit menu Terminal.
❯❯ Opens an integrated, fully functional terminal that can be used to enter commands directly.
Installing Updates #
▷ Open the Cockpit menu Software updates.
▷ Select Check for updates (arrow) top right.
▷ Select Install all updates to perform the available updates.
Alternatively, install updates via a terminal.
Network Information #
▷ Open the Cockpit menu Networking to call up network information such as IP address and network name.
See also: Assigning a Static IP Address.
SOS Report #
The SOS report collects system information that can help diagnose problems. This information is only stored on the system and can then be downloaded.
▷ Open the Cockpit menu Diagnostic reports.
▷ Select Run report.
▷ Define a report label as the name for the report and, if necessary, a password (encryption passphrase).
▷ Select Run report.
❯ An SOS report is created.
▷ Select Download to download the SOS Report.