OPC UA (Unified Architecture) is an evolution of the OPC specifications, enabling not only the transport of data from machines and systems but also the machine-readable semantic description of this data. It is a platform-independent standard based on TCP, available to members of the OPC Foundation. The OPC-UA specification includes various profiles to scale individual functions.
This article demonstrates how Node-RED can be used for communication with other systems using the OPC UA protocol (Open Platform Communications Unified Architecture). The OPC UA server runs on the controller, in this case, a CODESYS-based controller on a RevPi Connect 4.
Prerequisites #
Hardware
✓ RevPi Connect 4
✓ RevPi DIO - digital I/O module
✓ RevPi AIO - analog I/O module
✓ Inductive proximity sensor (3 wires, PNP)
✓ PT-1000 temperature sensor (4 wires)
✓ Connection cables (for wiring the RevPi DIO and the LED).
Software
|
Note
|
From the RevPi Bookworm Image (08/2025), the firewall on the RevPi must also be enabled to allow the default ports of the OPC UA Server: ▷ Add the service opcua-server-default to the firewall settings in Cockpit, see Firewall. |
Step 1: Setting up the System #
Follow these steps to configure your system with the RevPi Connect 4 and expansion modules RevPi DIO and RevPi AIO. For detailed instructions, refer to the Getting Started.
▷ Connect the RevPi DIO and RevPi AIO to the RevPi Connect 4.
Ensure the expansion modules are securely connected to the RevPi Connect 4 via the PiBridge interface.
▷ Connect the inductive proximity sensor to a digital input of the RevPi DIO.
▷ Connect the PT-1000 to the RTD channel 1 of the RevPi AIO.
▷ Connect the RevPi Connect 4 to the power supply.
▷ Establish a network connection.
▷ Login via a web browser to the RevPi Connect 4.
Step 2 : OPC UA Node Installation #
The standard installation of Node-RED includes basic nodes that are most commonly used. However, there is an extensive library of additional nodes that you can use. To use the OPC-UA protocol, you need to install the provided nodes node-red-contrib-opcua. This installation can be done either via the command line with the Node Package Manager (npm) or simply via a terminal.
▷ Start Node-RED.
▷ Open the menu and select Manage palette.
▷ Search for node-red-contrib-opcua to proceed with the installation.
|
Note
|
You can also install a Node package manually. |
Step 3: Setting up the OPC-UA Server #
▷ Open CODESYS.
▷ Open the installer under .
▷ Before proceeding with the installer, close the main window of your CODESYS application.
▷ Select Install File in the installer.
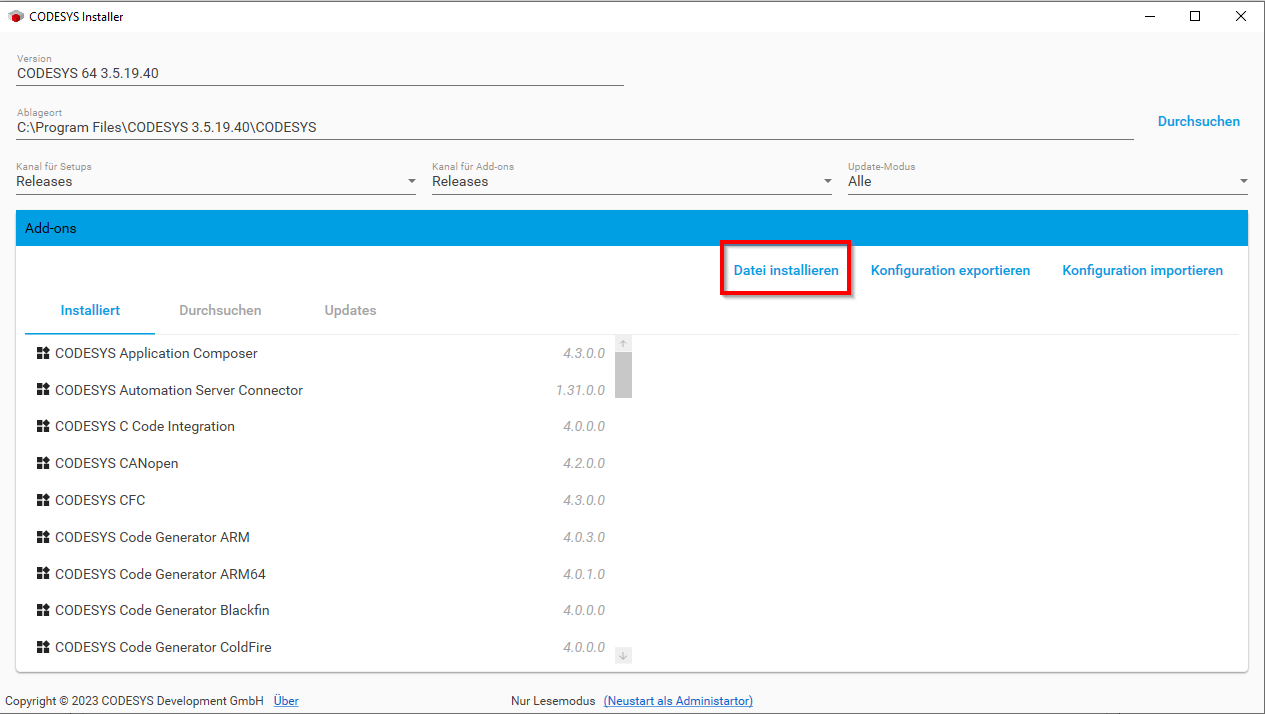
▷ Follow the installation steps to install the packages from your PC to your CODESYS application.
▷ To install CODESYS Control Linux ARM 64 bit, select .
❯ The window CODESYS Installer opens.
▷ Search for CODESYS Control for Linux ARM64 SL and select Install.
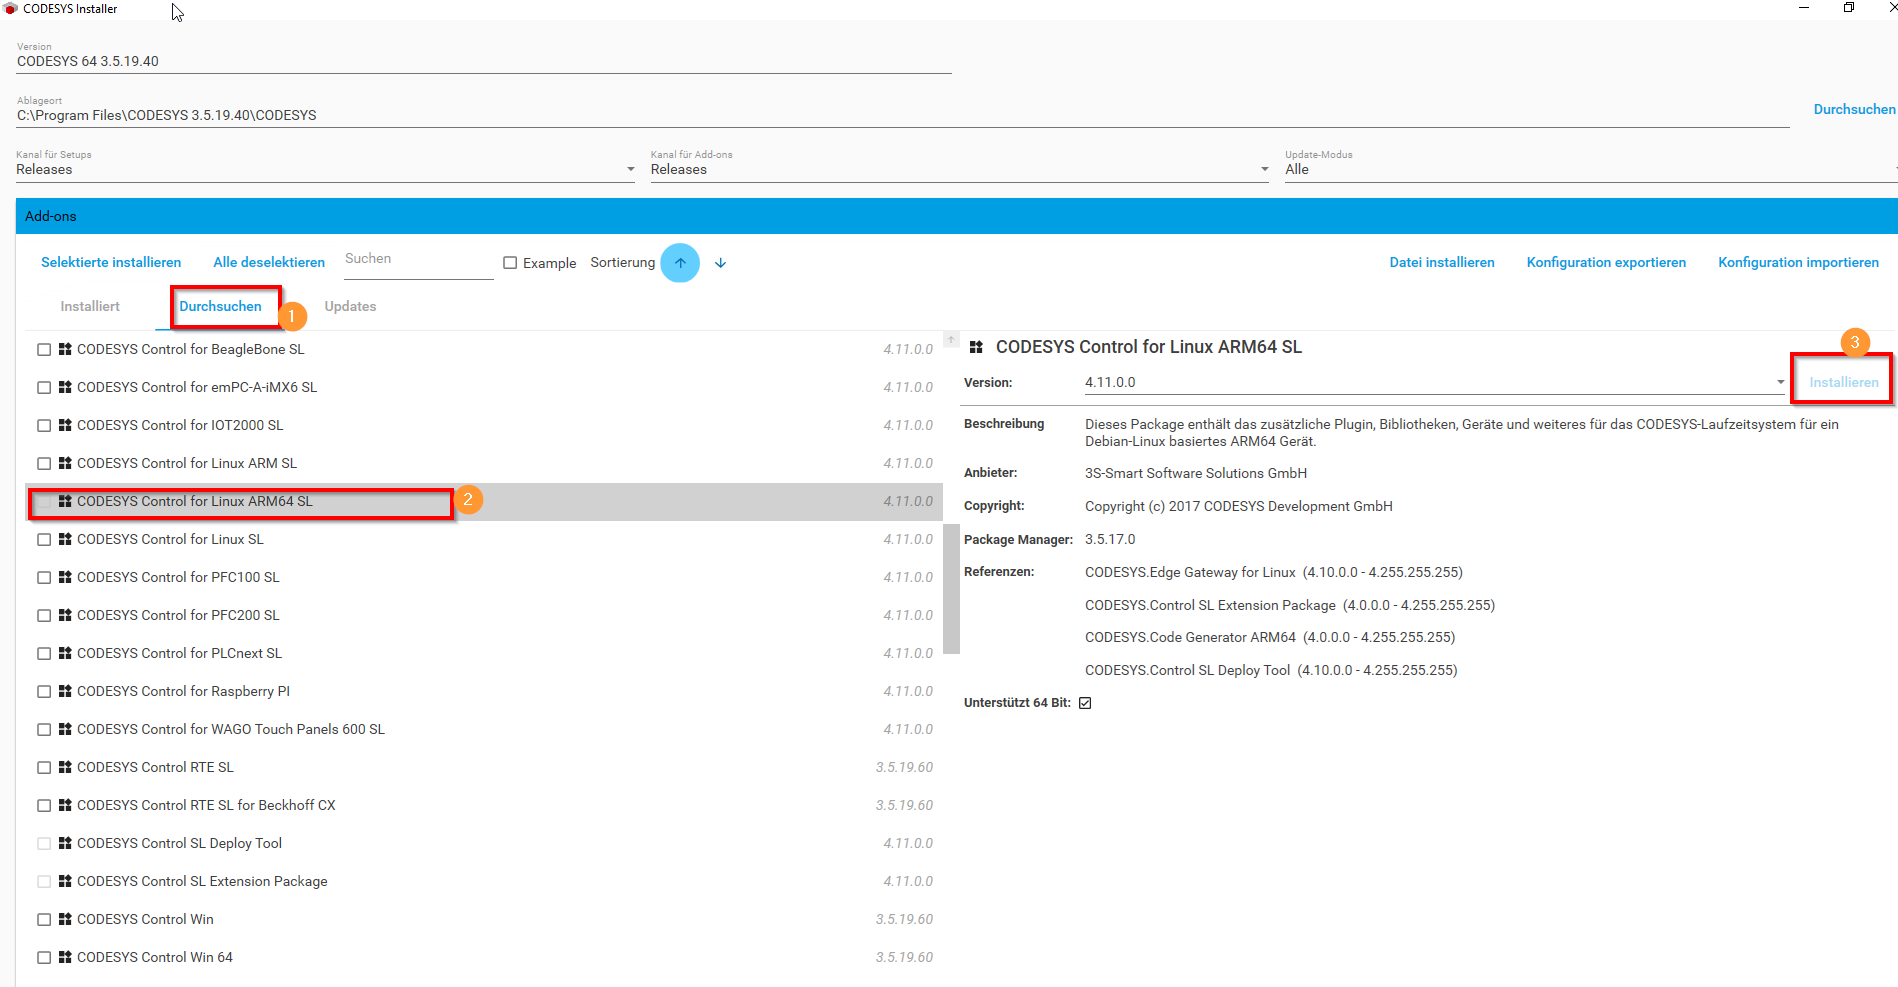
❯ The two packages are now listed as Installed in the CODESYS Installer and thus installed on your application.
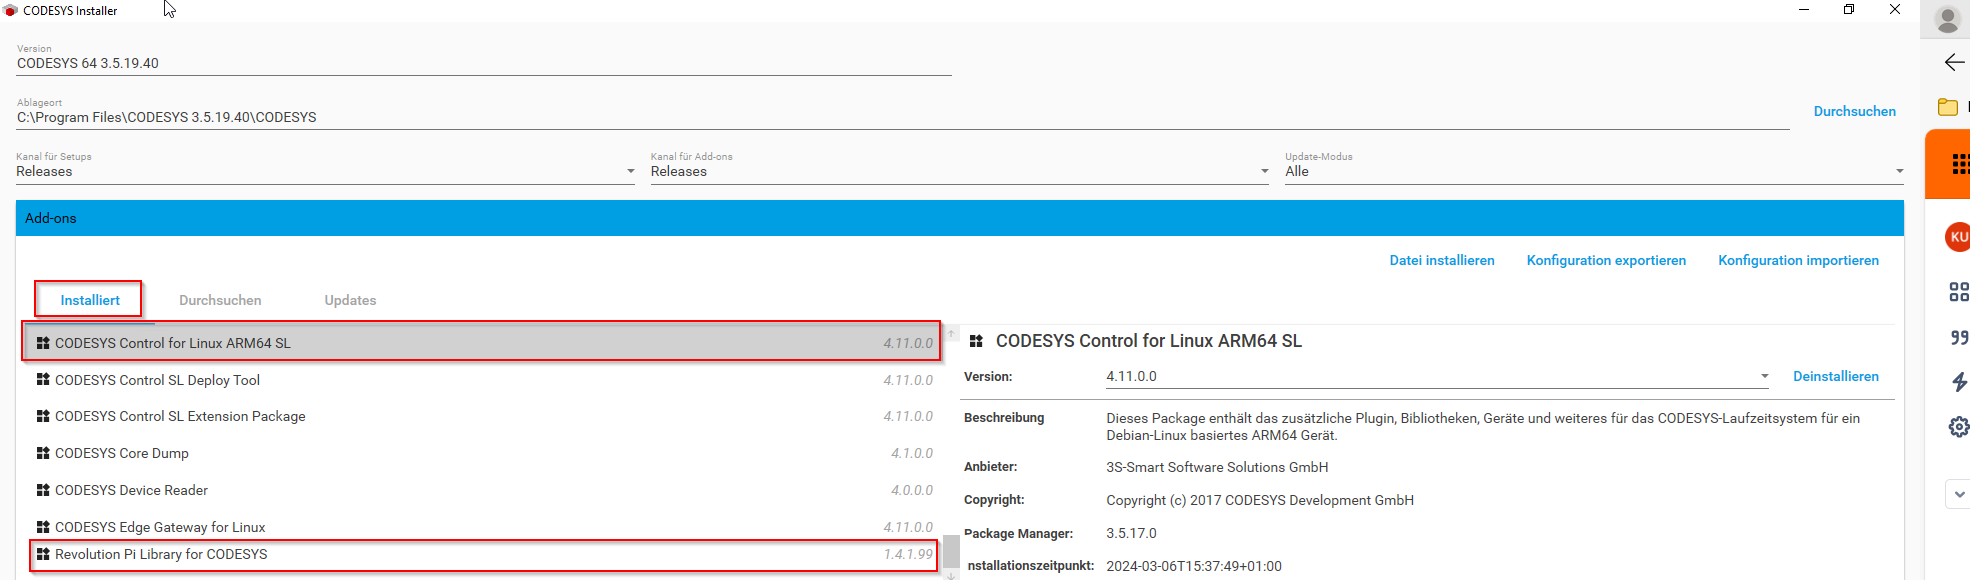
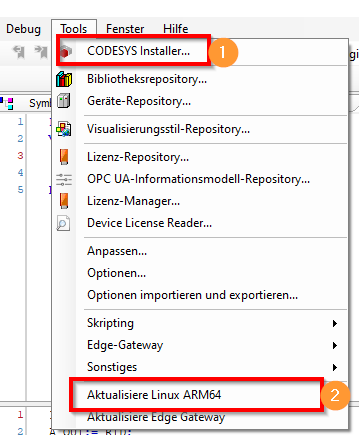
▷ Select to transfer the installation to the controller (here the RevPi Connect 4).
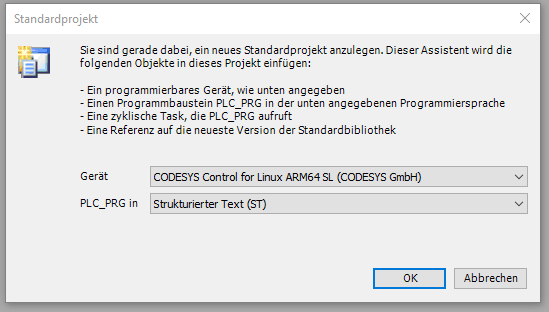
Step 4: Creating a CODESYS Project #
▷ Create a new standard project with CODESYS Control for Linux ARM64 SL in CODESYS.
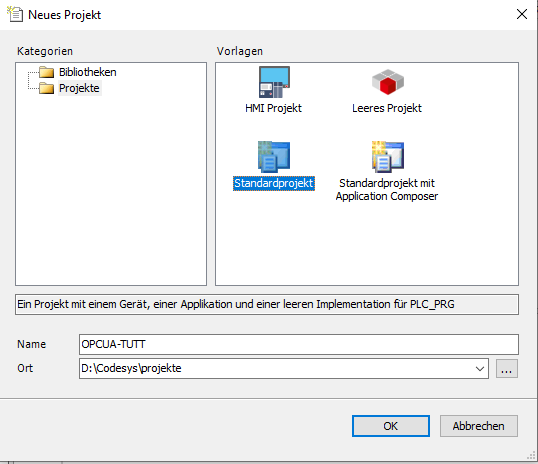
▷ Select CODESYS Control for Linux ARM64 SL.
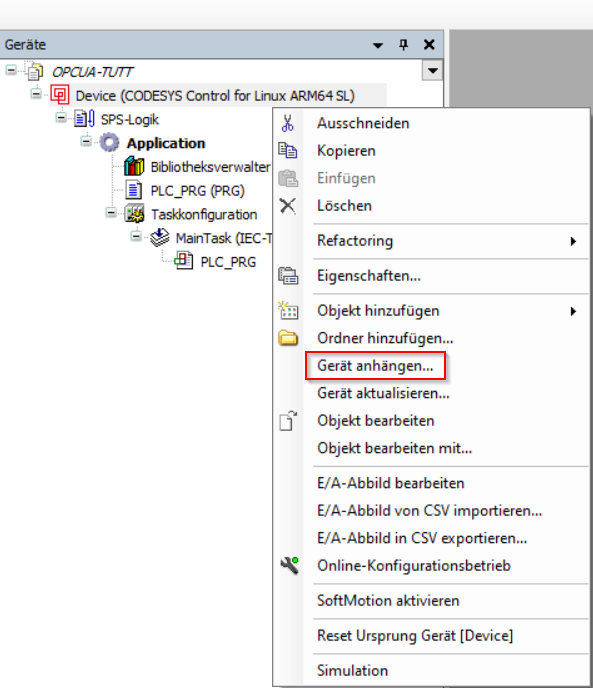
▷ Open the context menu of Device in the device tree.
▷ Select Add Device.
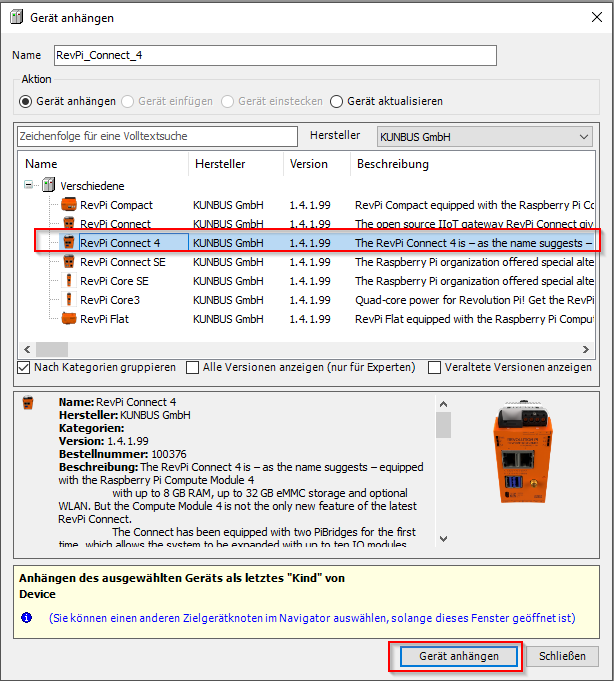
❯ A window with a list of all RevPi base modules opens.
▷ Select the base module RevPi Connect 4.
▷ Confirm with Add Device.
You can optionally use additional RevPi expansion modules.
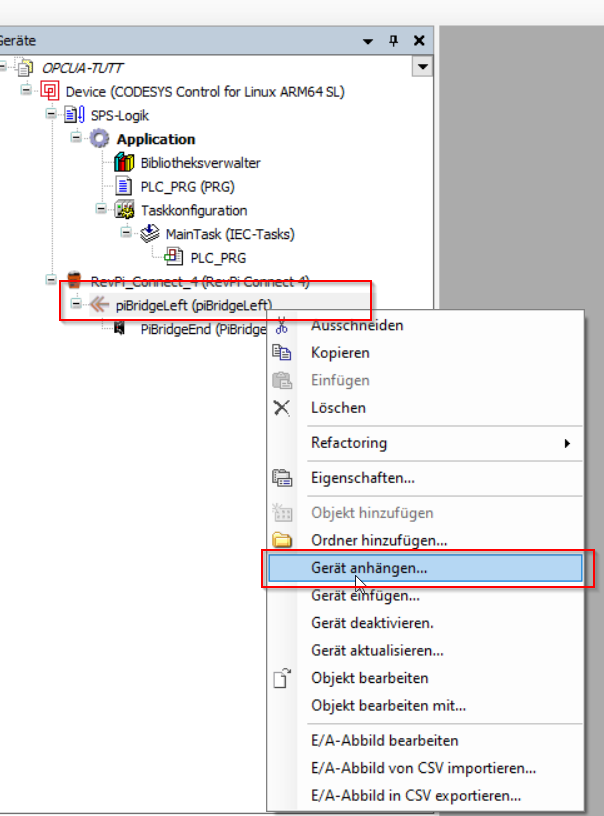
▷ Open the context menu of the RevPi base module you added in the previous step.
▷ Select Add Device.
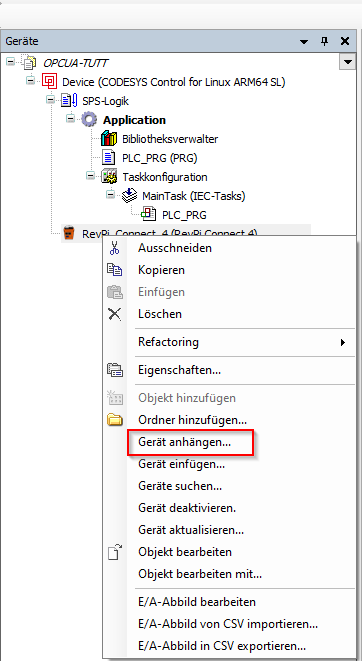
▷ Select the device interface piBridgeLeft or piBridgeRight, to arrange a expansion module.
▷ Select Add Device.
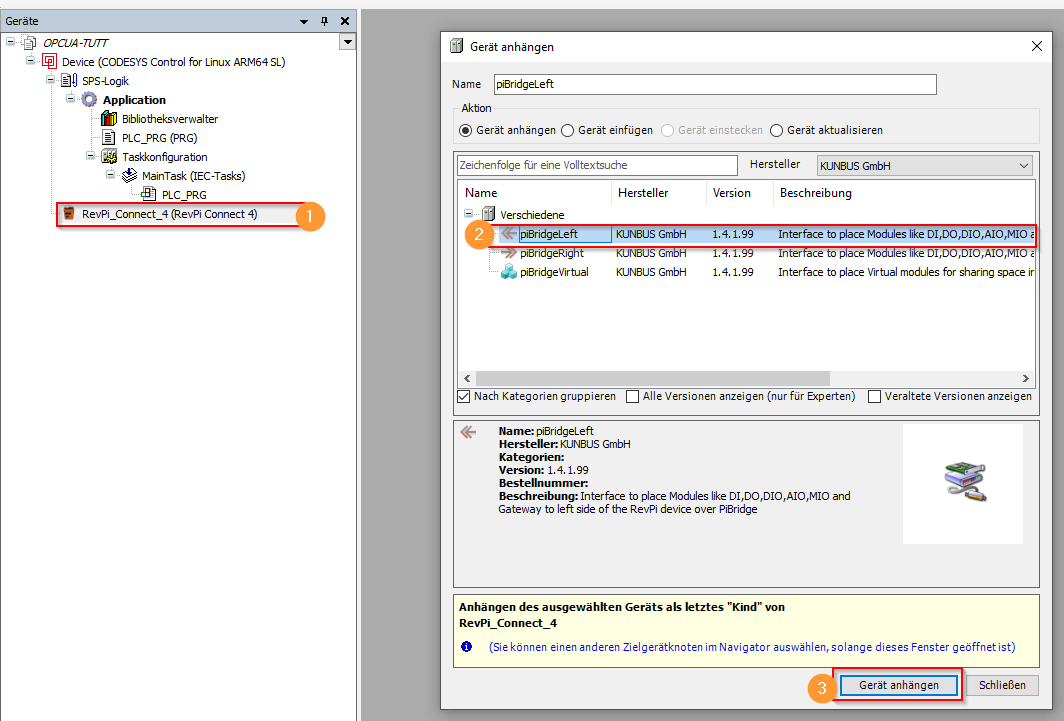
▷ Select the attached expansion module.
▷ Confirm with Add Device.
❯ Here, the available modules that can be connected to the left or right of the RevPi Connect 4 are displayed. In this example:
-
RevPi DI - digital input module
-
RevPi AIO - analog I/O module
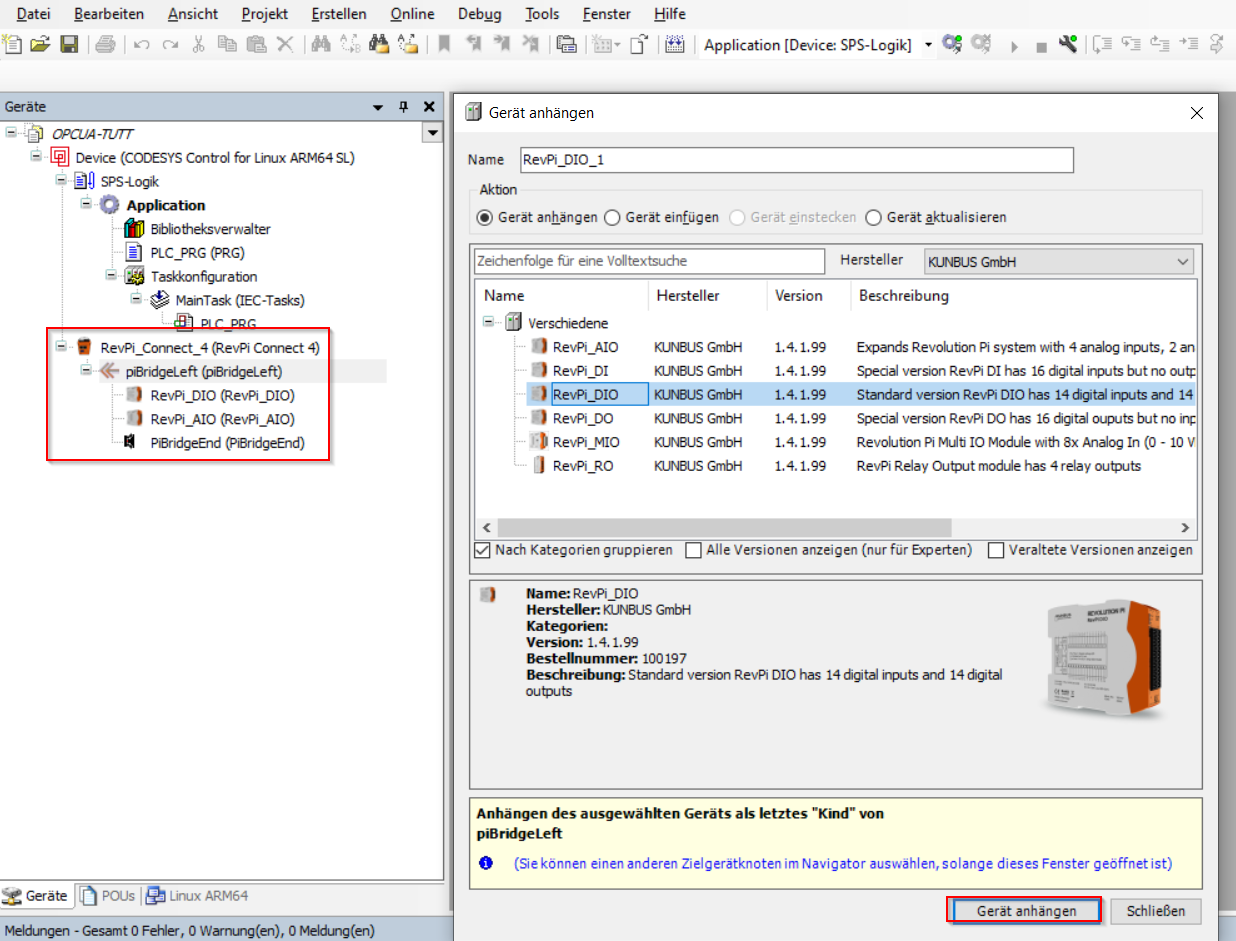
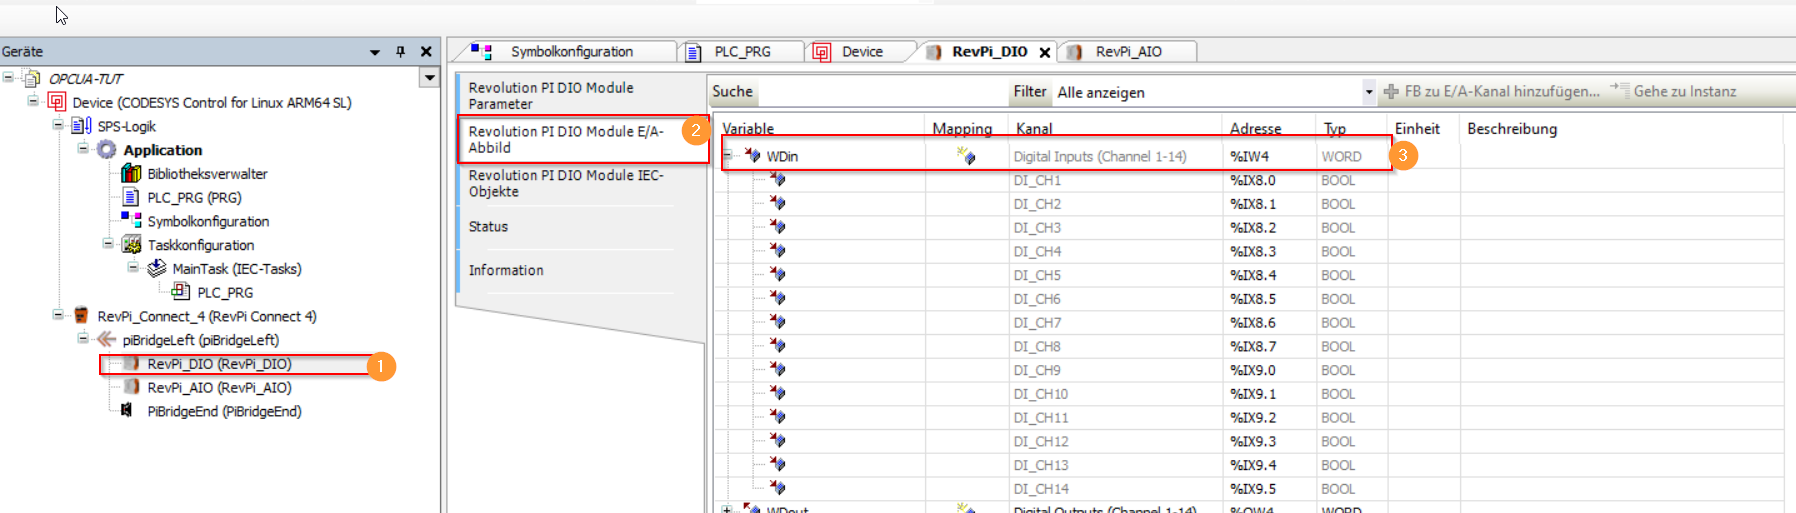
▷ Configure the pins on RevPi DIO:
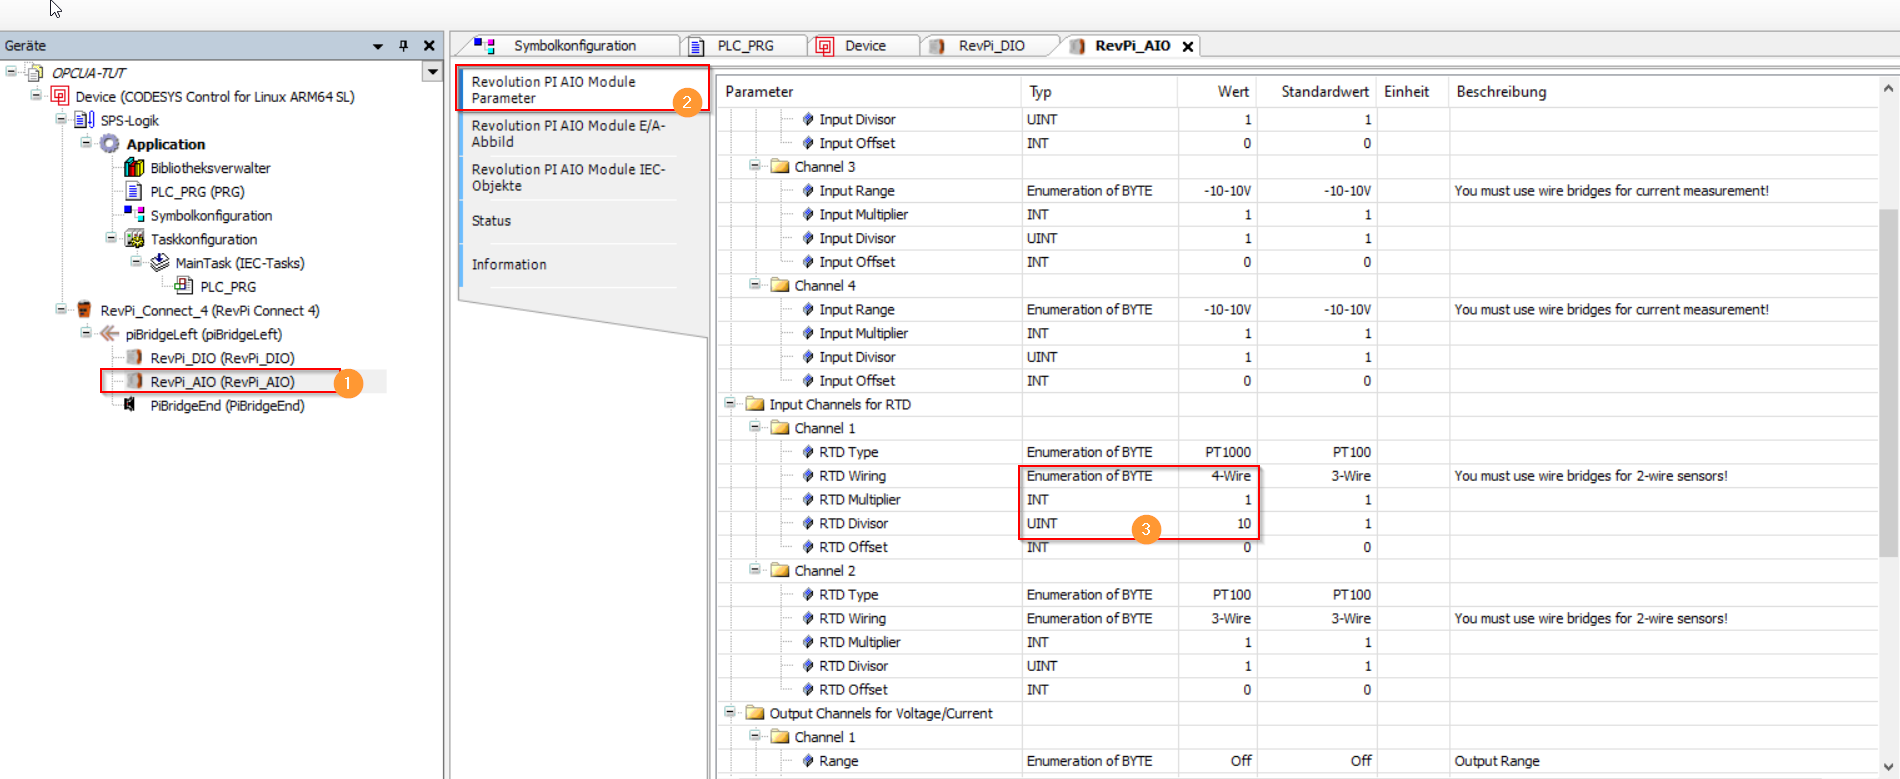
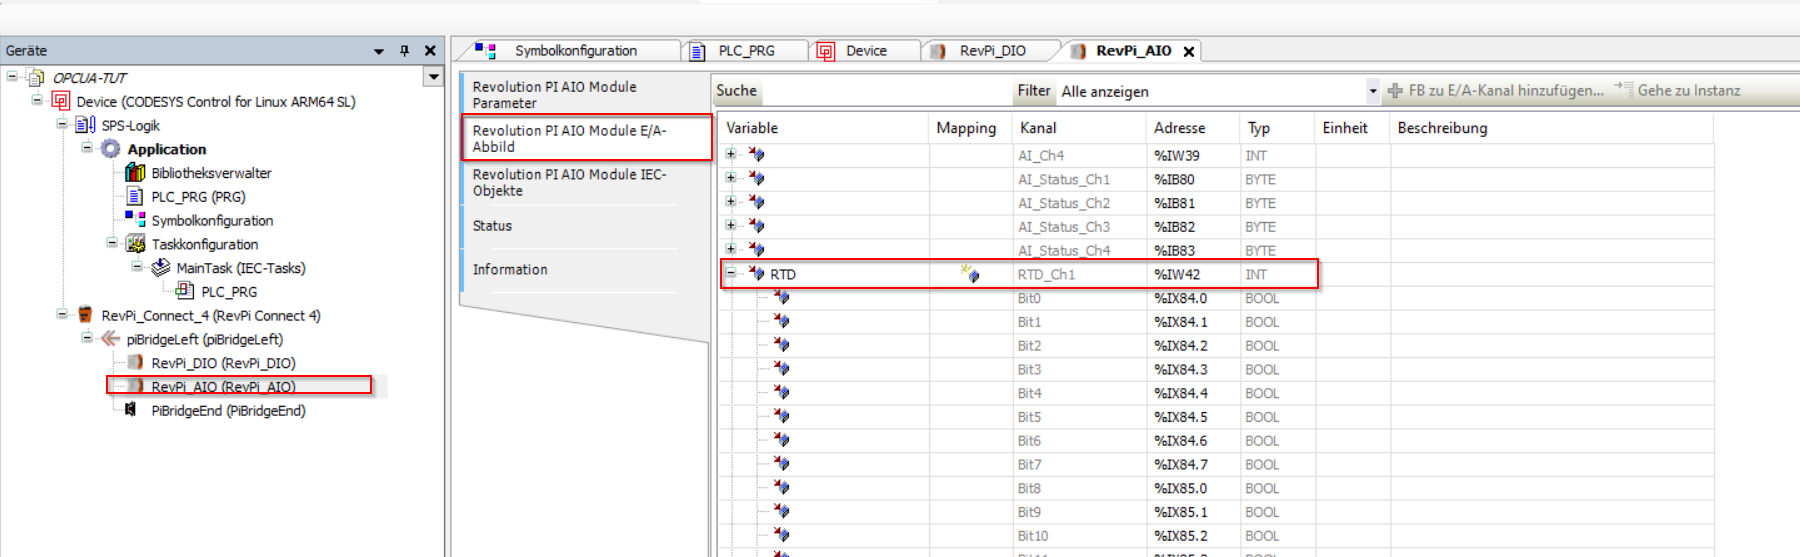
▷ Configure RevPi AIO for the PT-1000 temperature sensor.
It uses the RTD channel 1 (RTD1).
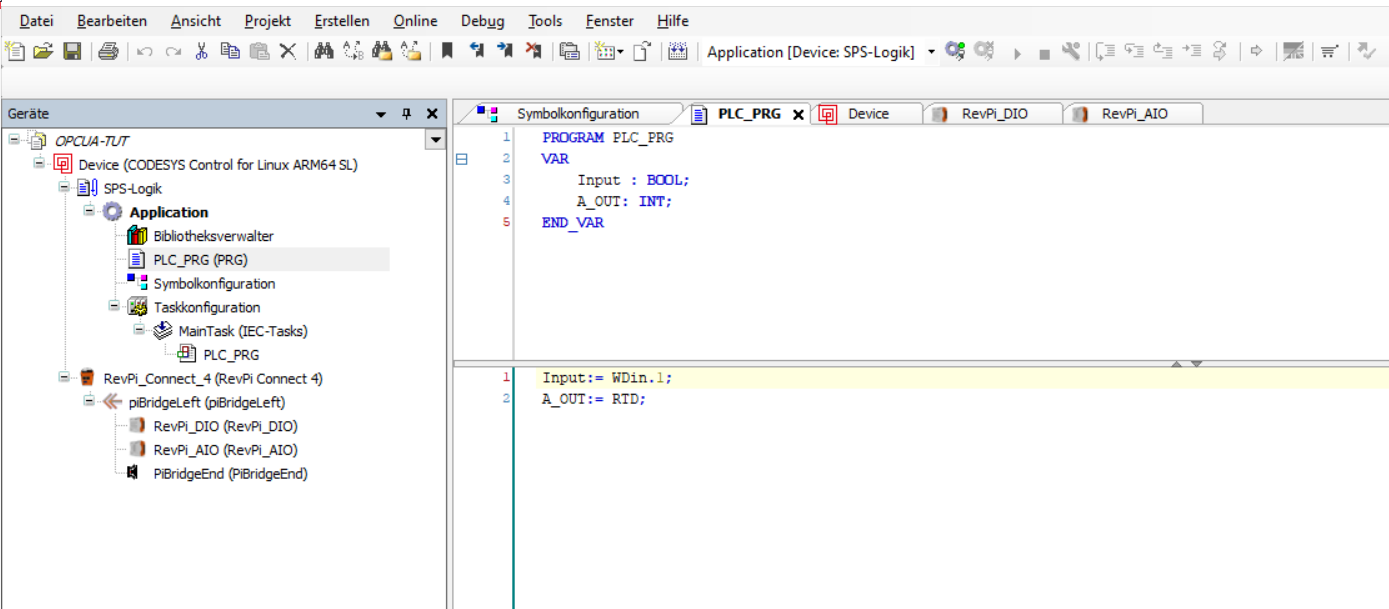
Step 5: Create the CODESYS Program #
In the program, two variables are defined. The variable A_OUT accesses the channel of RTD_Channel 1 and returns the temperature value. The variable Input accesses input 2 of the digital input of the RevPi DIO, where the signal line of the inductive sensor is connected.
Step 6: Setting up the OPCUA Server #
The OPC UA server function is natively included in the CODESYS development environment. In the program OPCUA-TUT, we will publish the status of an input and the value of a temperature sensor.
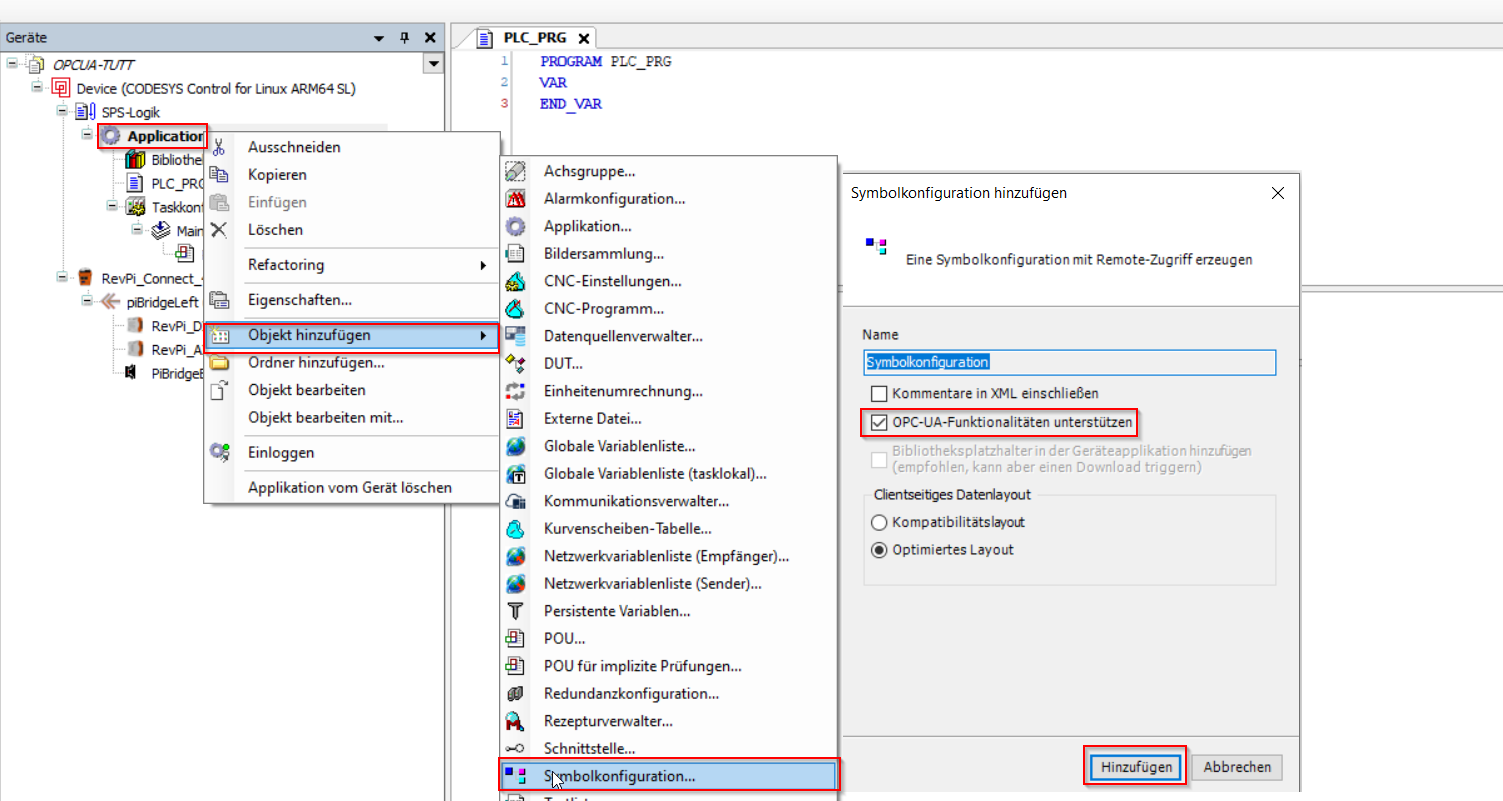
We have added the symbol configuration object to the project and enabled the OPC UA properties.
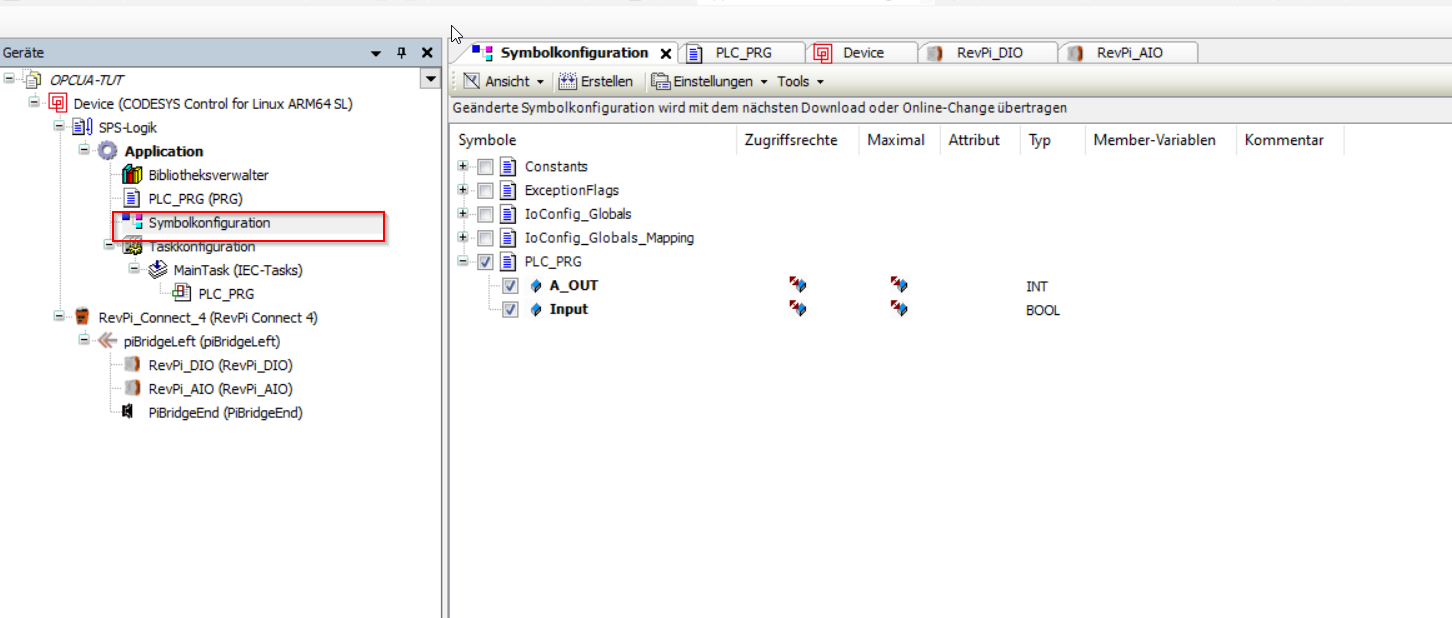
Step 7: Publishing Variables #
In the symbol configuration editor, we find a list of all variables present in the program. We only activate those we want to publish: the BOOL type Input, which returns the status of the digital input, and the temperature, represented by A_OUT of type INT, which returns the temperature value.
For each variable, we can change the permissions (Read, Write, Read/Write) by selecting the access rights column. After the program is loaded and executed on the target, it is possible to access the published variables with an OPC UA client.
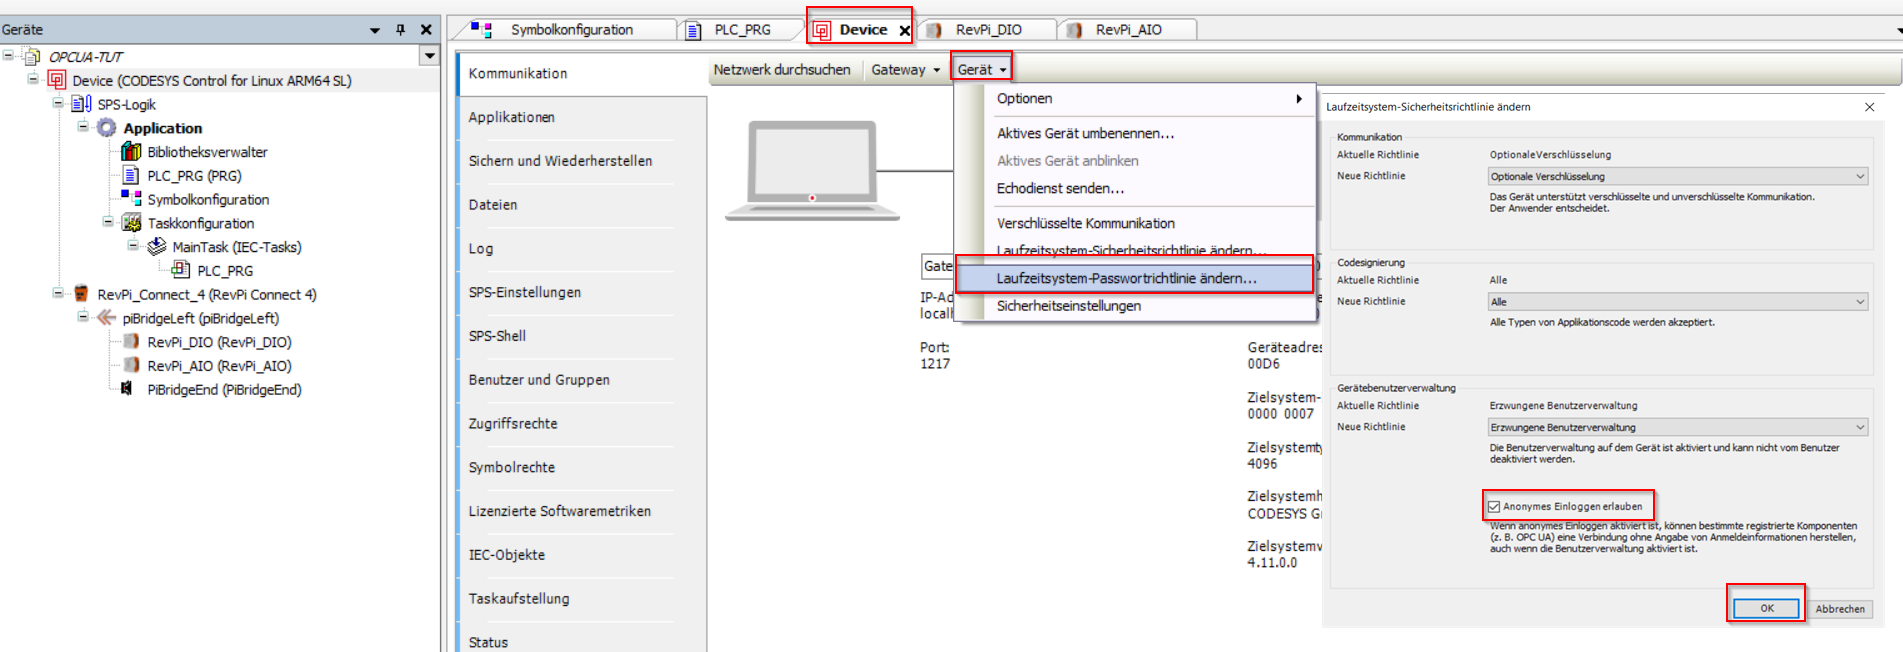
Now there is also the possibility to secure data transmission, and this can be done in two ways. First, through user authentication by changing a communication policy.
Second, it can be determined whether anonymous login is allowed, which means that you can access the OPC-UA servers without user management, or not. In this case, we have allowed it.
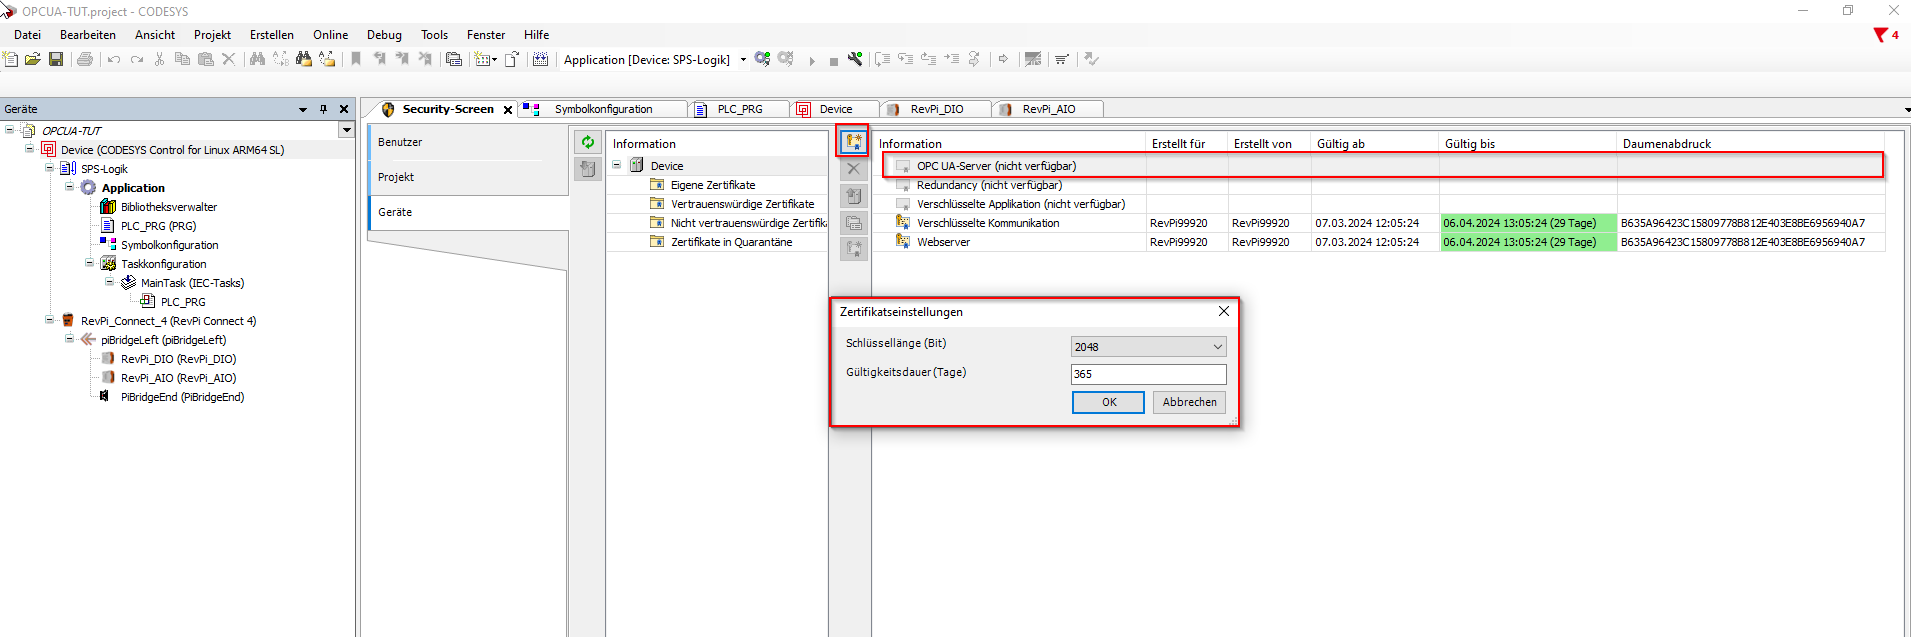
For for secure data transmission via OPC UA, we need a way to encrypt the data stream. This is now done via the Security Manager. It checks whether a certificate is stored for the device to encrypt the data transmission via X.509.
▷ Select Devices.
❯ The available information on the device is displayed.
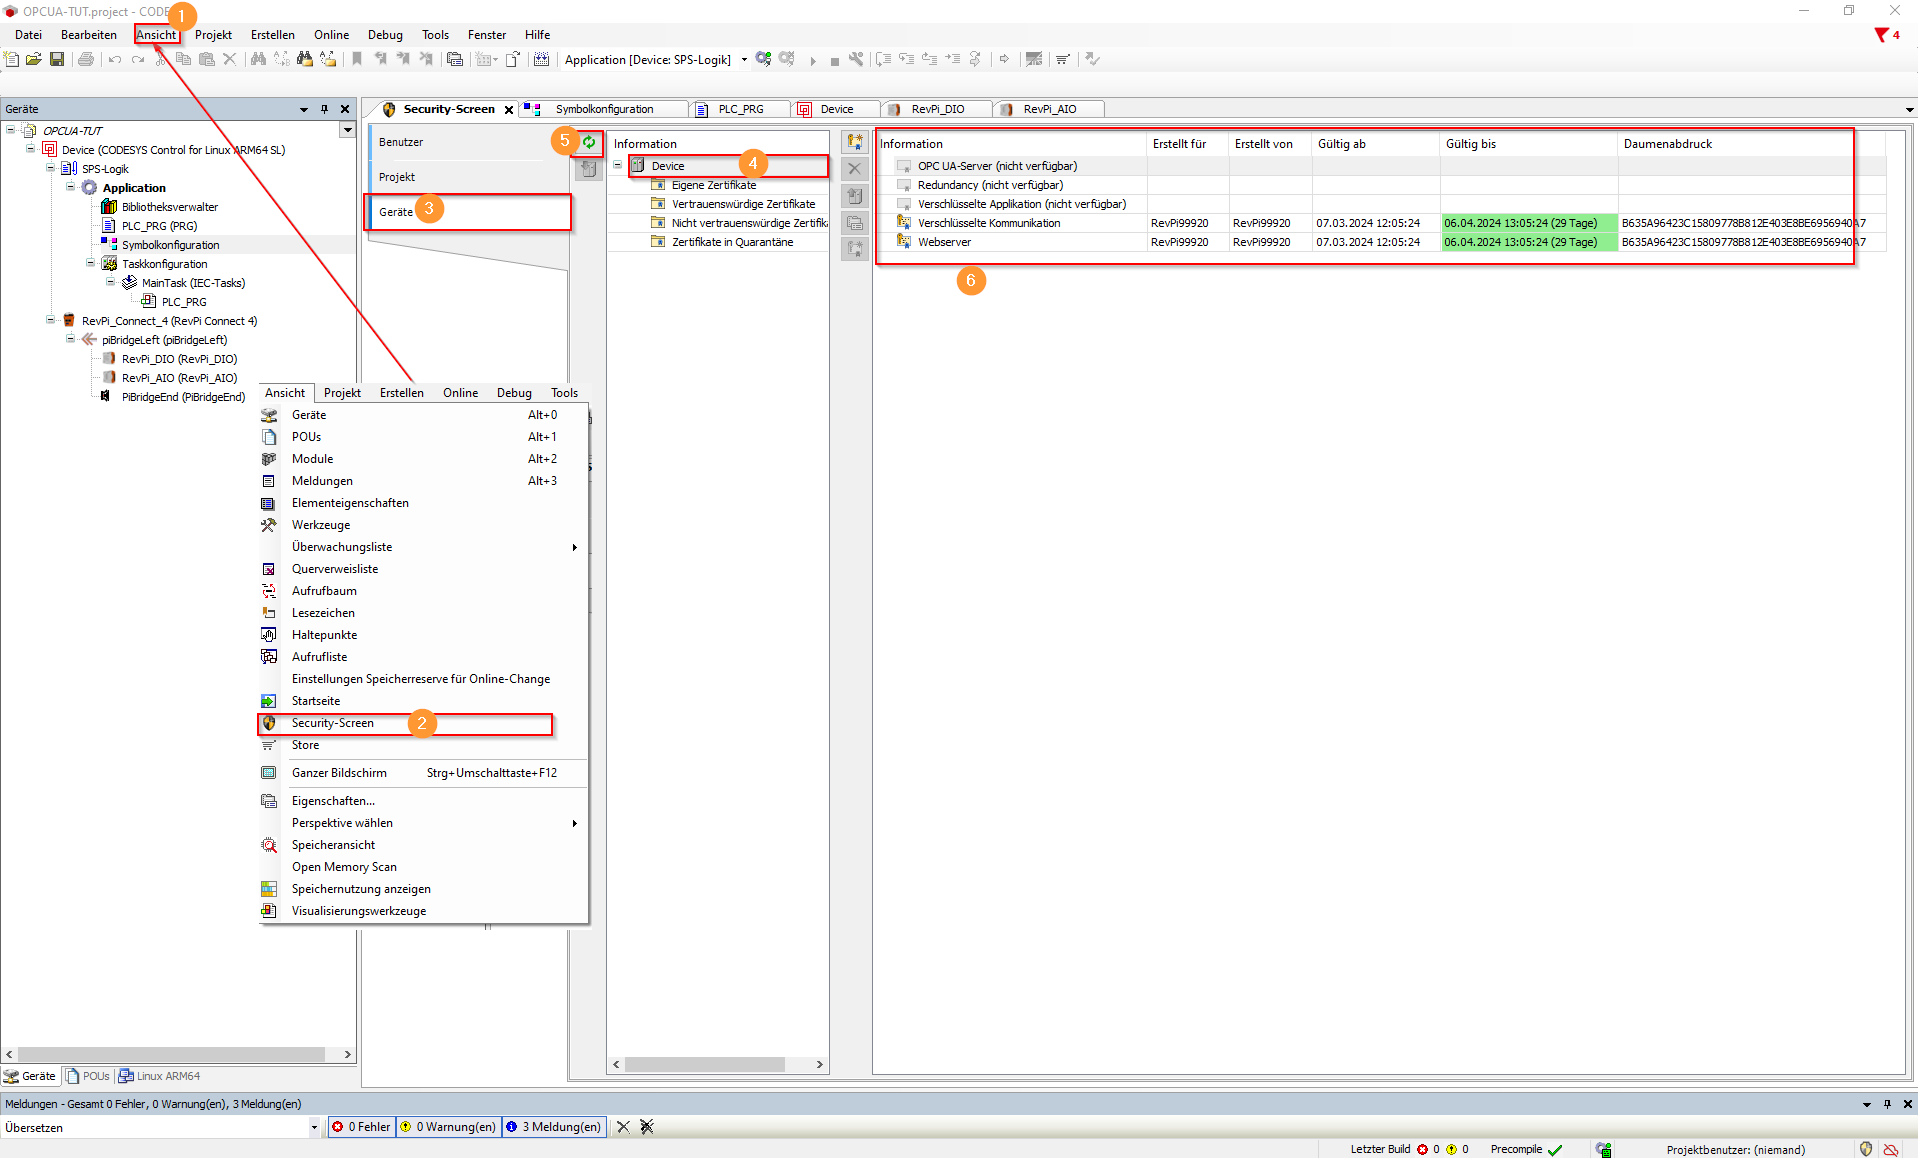
In this case, the following information is available:

|
Note
|
An encryption of the OPC UA service is essential. First, it must be checked whether a certificate is stored. If not, as shown in the image above, one must be generated. |
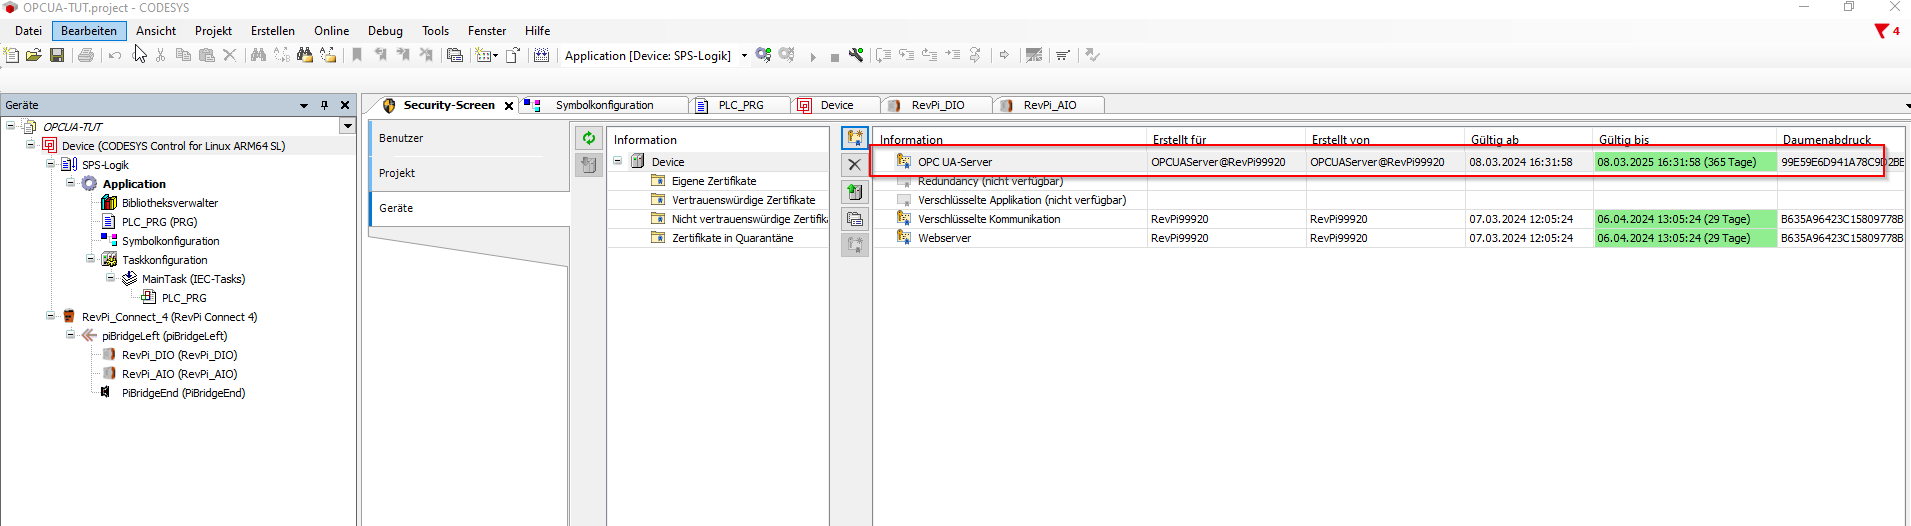
The OPC-UA server now has a valid certificate:
Step 8: Setting up OPC UA Client #
UaExpert® is a cross-platform OPC UA test client. The program, along with many other programs and documentation, can be downloaded for free from the Unified Automation company’s website.
To connect to our system and interact with the published variables, we can define a server to connect to.
▷ Select .
❯ A popup opens.
▷ Set the system IP address.
▷ Confirm with Ok to proceed.
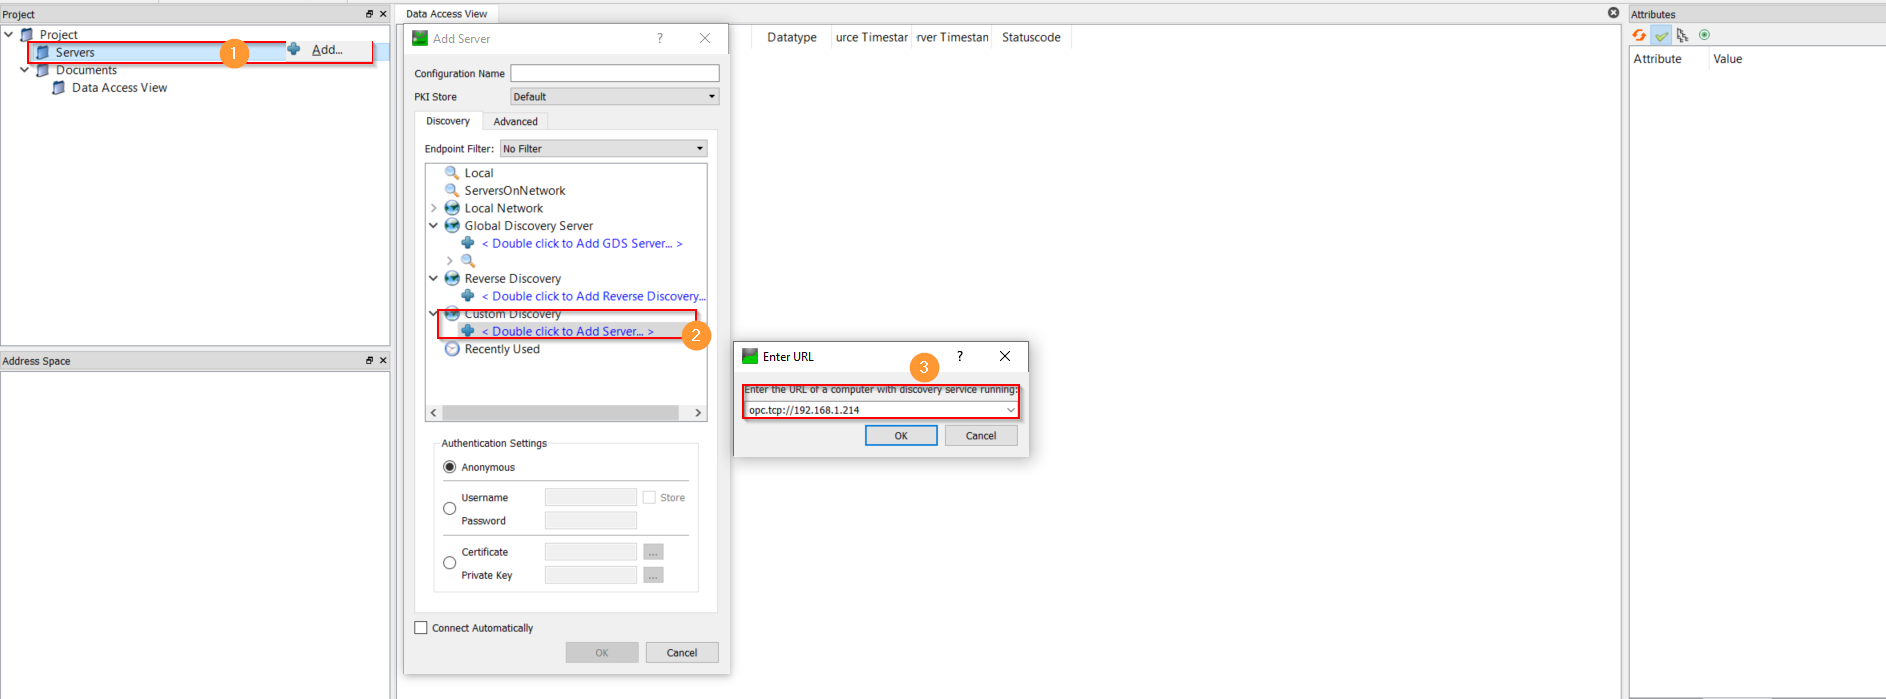
❯ The program will connect to the server and display it in the list. An entry will appear similar to this: opc.tcp://192.xxx.xxx.xxx:, where opc.tcp indicates the protocol over TCP. When you expand the menu opc.tcp://192.xxx.xxx.xxx:, an automatic detection of the server with the correct name will appear in this form: OPCUAServer@RevPi99920(opc.tcp://192.168.1.214).
▷ Select a communication option, e.g., None-None(uatcp-uasc-uabinary).
▷ Select Ok to proceed.
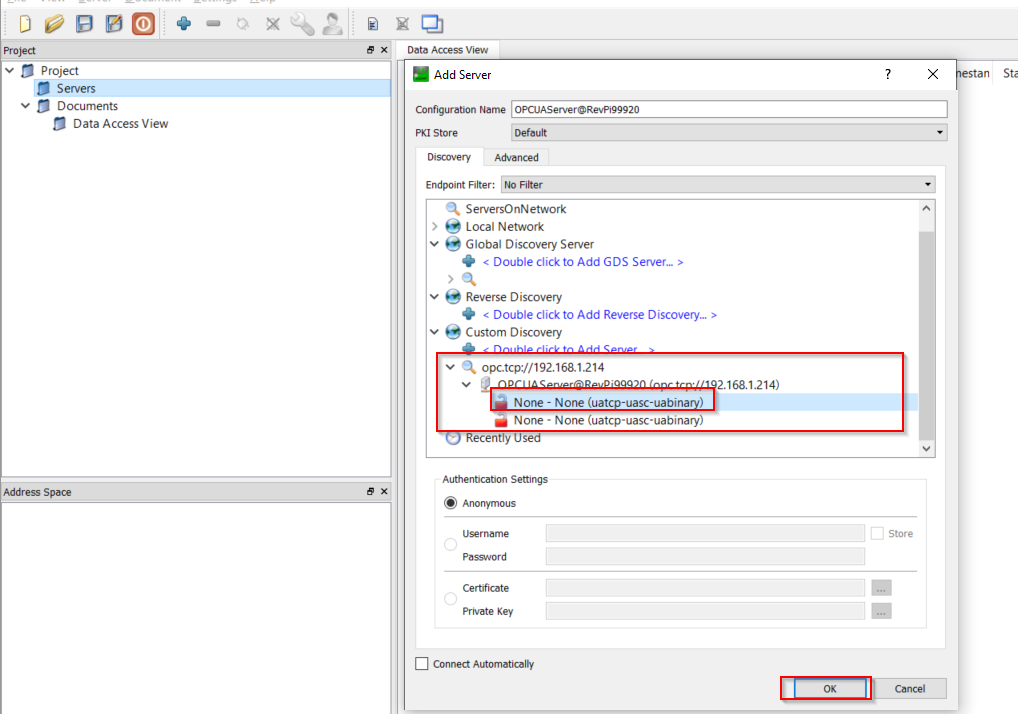
▷ To connect to the server, open the context menu of the server and select Connect in the window that appears.
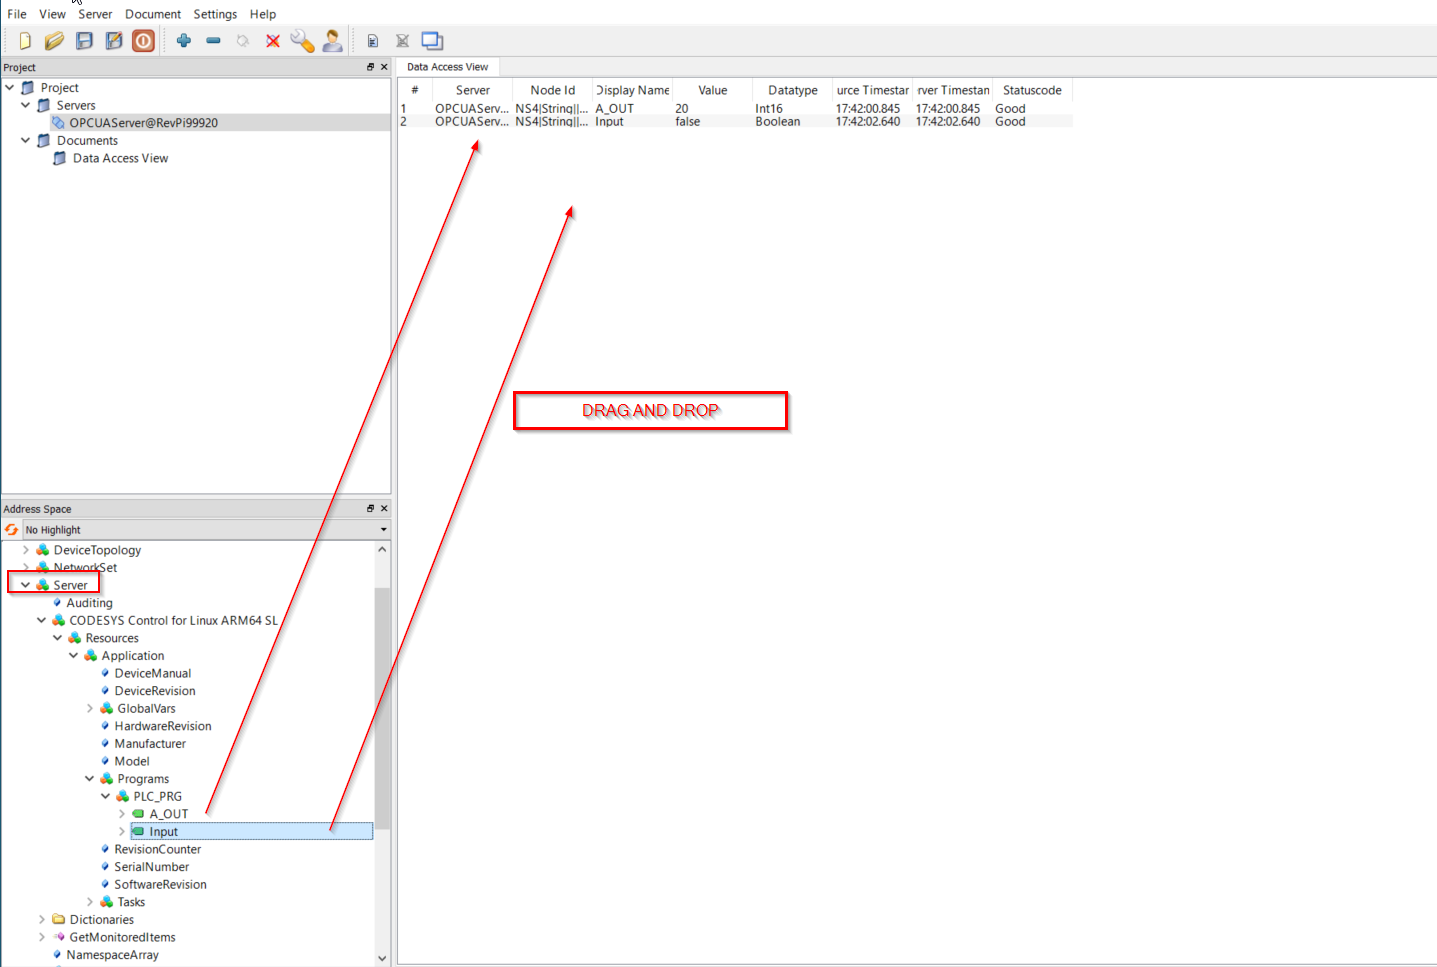
Once the connection is established, you can search for and interact with the desired variable.
▷ Select a communication method, e.g., None-None(uatcp-uasc-uabinary) and select Ok.
Step 9: Create Node-RED Flow #
Node-RED program with the associated dashboard that connects to the OPCUA-TUT program:
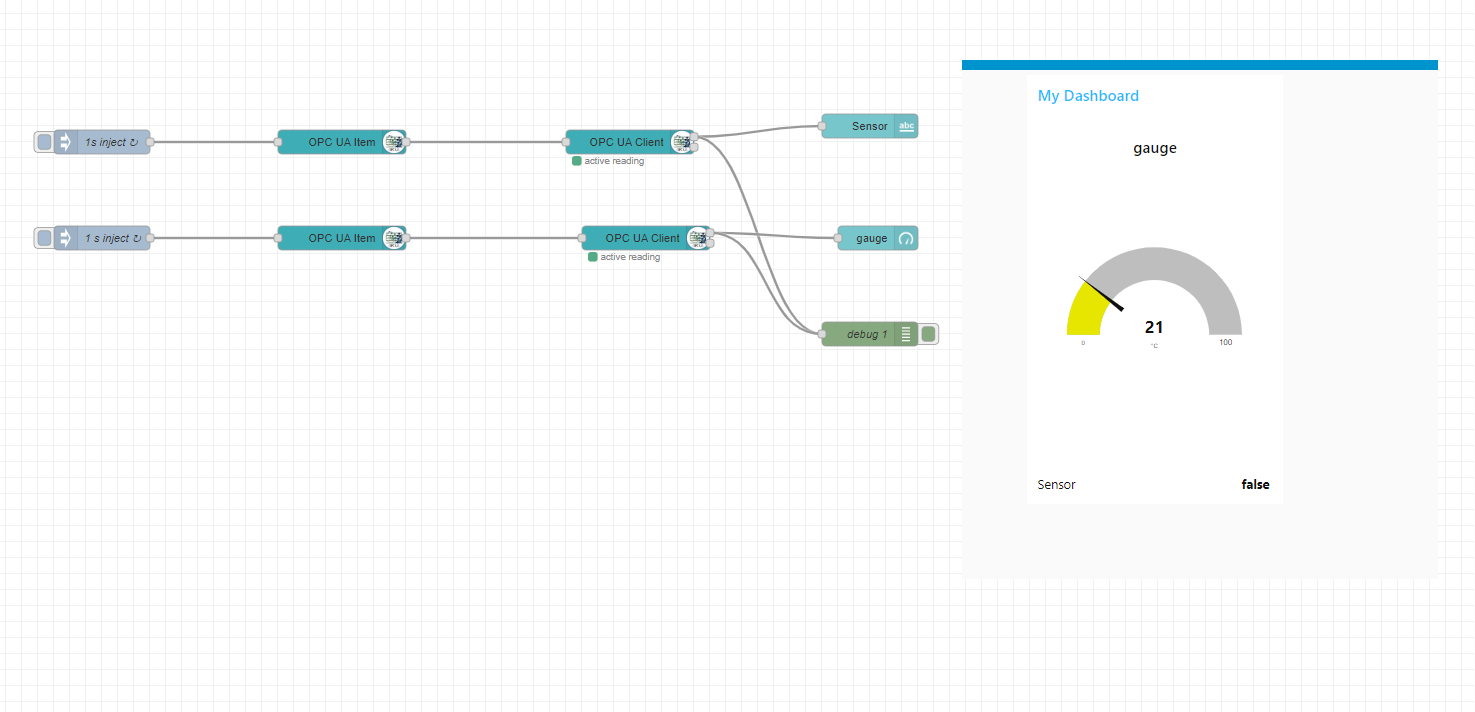
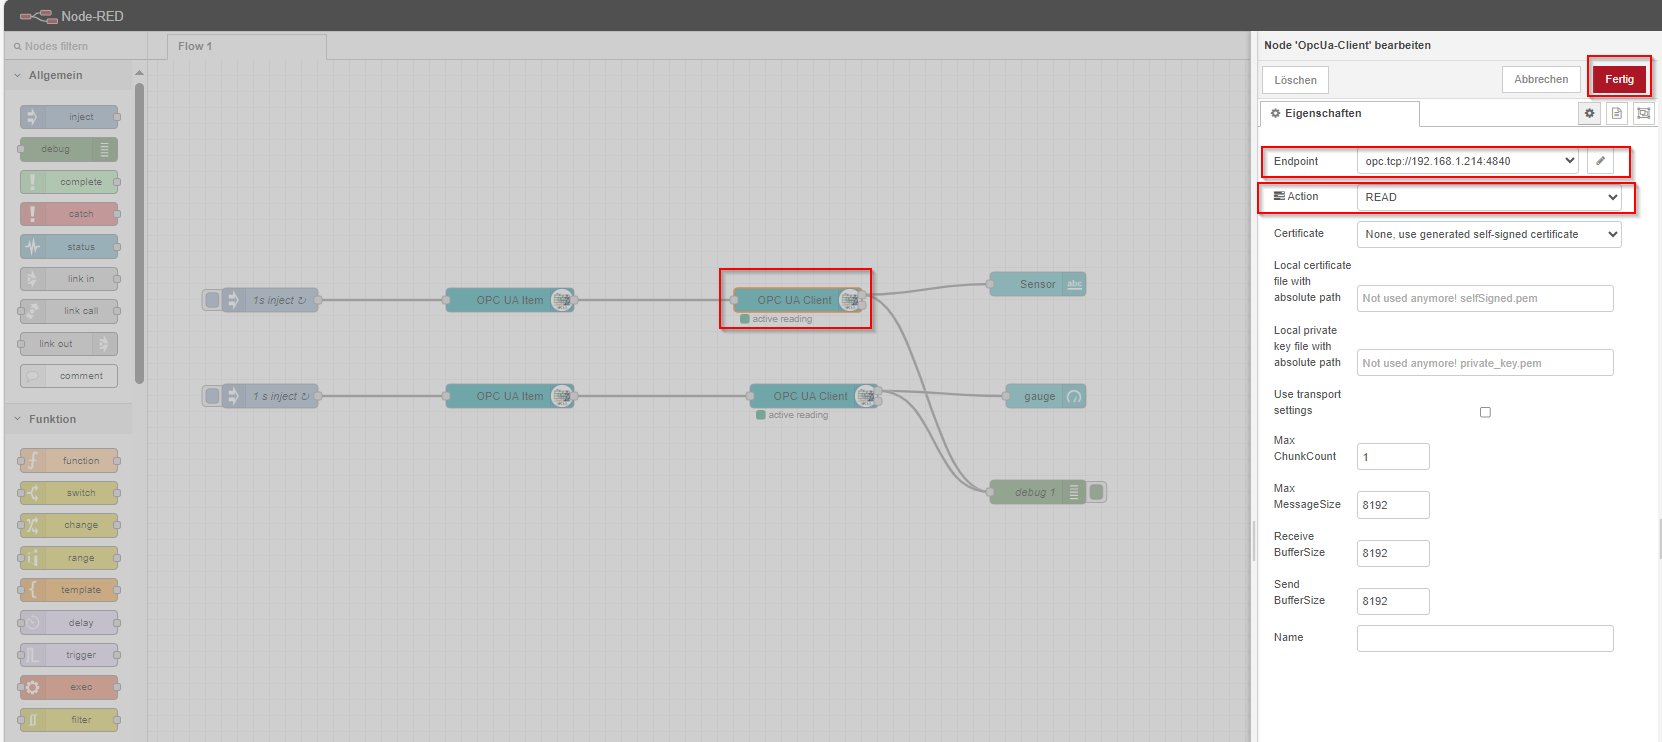
Communication with the CODESYS OPC UA Server is done via the OpcUa-Client node, where the endpoint is defined as the address and port of the OPC-UA server (in the example: opc.tcp://192.168.1.214:4840). For read operations (variables Input and A_OUT), the action READ is defined.
▷ Specify the Item in the node OpcUa Item. It consists of the NodeId of the variable to be accessed.
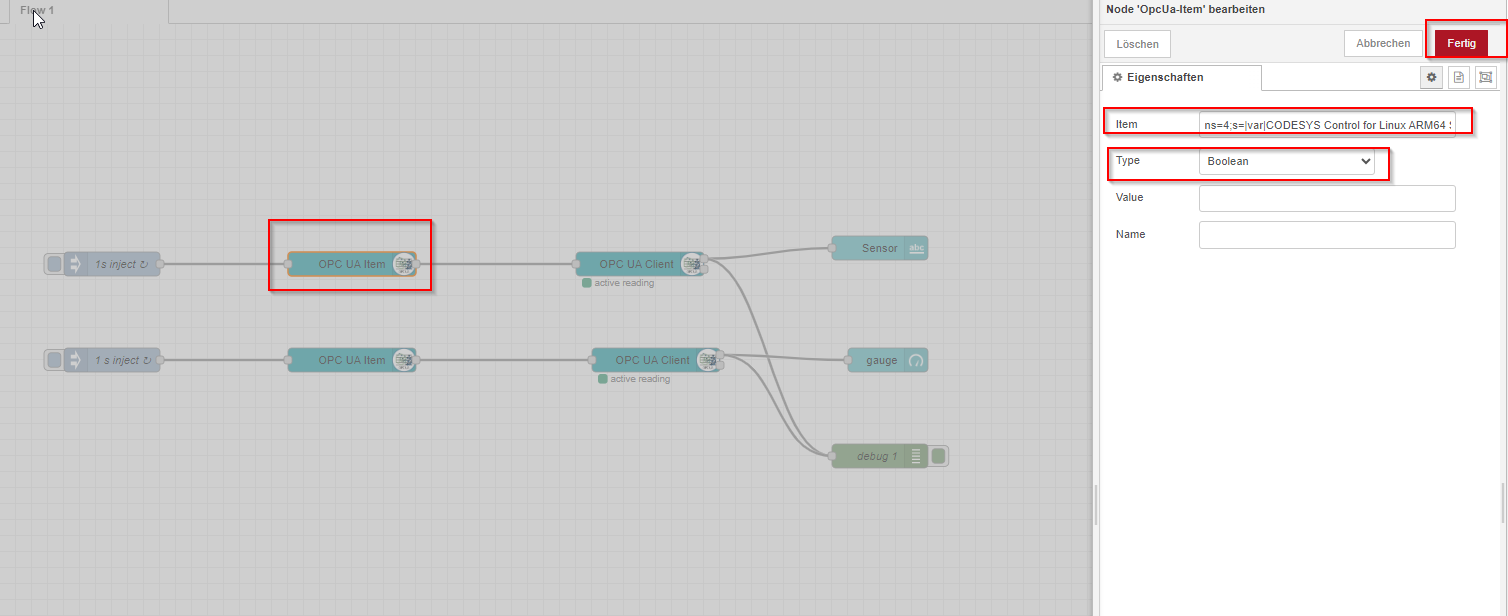
The Item can be retrieved in UaExpert Client.

Example:
Input: ns=4;s=|var|CODESYS Control for Linux ARM64 SL.Application.PLC_PRG.Input

A_OUT: ns=4;s=|var|CODESYS Control for Linux ARM64 SL.Application.PLC_PRG.A_OUT
In the field Type, the type of the variable must be defined:
Input: Boolean

A_OUT: Int16